Developer Guide for E-Duke-8
- Developer Guide for E-Duke-8
1. Introduction
1.1. Software Overview
E-Duke-8 (pronounced “Educate”) helps CS2113/T students learn and understand software engineering and Object-oriented Programming (OOP) principles through a gamified platform and enhances their learning experience.
On this desktop application, CS2113/T students can attempt bite-sized quizzes, through the Command Line Interface (CLI), to test their understanding of the concepts taught, and serves to consolidate key concepts for easy revision.
E-Duke-8, comprises of a Logic component, UI component, Storage component, and Model component. Each component comprises of multiple classes that work in tandem, to fulfil the purpose of our program.
The purpose of this developer guide is to allow any interested contributors, who wish to develop this learning companion further, understand the inner workings of the program. This understanding will enable such contributors to add value to the current code, by improving its performance, level of interaction or capabilities.
1.2. Setting up
First, fork this repo, and clone the fork into your computer.
You are recommended to use Intellij IDEA to edit the program.
- Configure the JDK: Ensure Intellij is configured to use JDK 11.
- Import the project as a Gradle project: Choose the option to import the project as a Gradle project when prompted.
- Verify the setup: Enter some commands to ensure E-Duke-8 functions as expected. Refer to our User Guide for more information.
2. Design & implementation
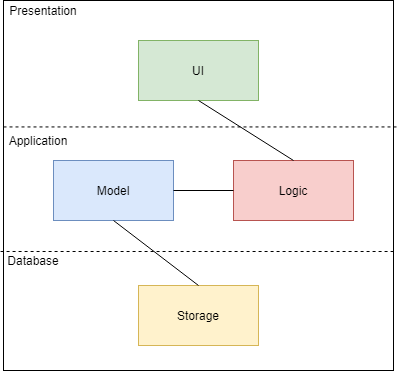
2.1. Architecture
The high-level design of our program is based on a 3-tier architecture which consists of the Presentation, Application and Database layers. The Logic component, UI component, Storage component, and Model component can be found in each layer as shown in the architecture diagram below.
2.2. Model Component
The data model is centered around DisplayableList objects which hold Displayable objects. This implementation
allows us to create various topics with questions, options, hints and explanations. This was also extended to creating bookmarks and notes.
2.2.1. Design of TopicList
TopicList is an ArrayList of type Displayable, which is 1 of the 6 interfaces implemented
in the code for E-Duke-8. As such, many of the commands that manipulate the TopicList make
use of the package java.util.ArrayList.
The TopicList is used to store Topic objects. Topic objects themselves implement the interface Displayable.
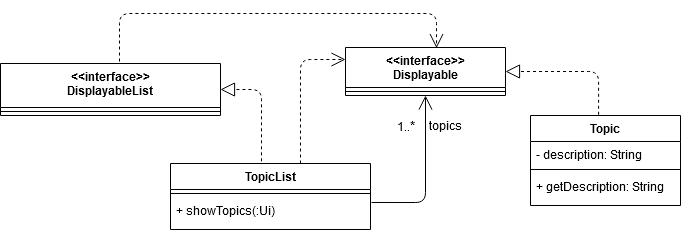
There is just 1 command that manipulates the TopicList, which is topics. The topics command shows all the
Topic objects in the current TopicList.
2.2.2. Implementation of TopicList
Listing topics in TopicList:
This task is performed by the TopicList.showTopics() method.
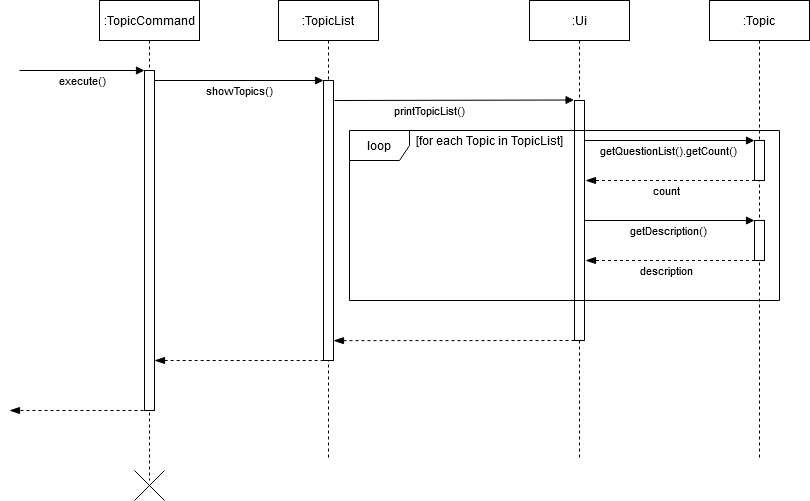
Step 1: The parseCommand() method instantiates a TopicsCommand object which then calls the
TopicList.showTopics() method.
Step 2. The TopicList.showTopics() method then calls the method Ui.printTopicList(). The
current TopicList is passed into the called method.
Step 3: The Ui.printTopicList() method then prints out the number of questions in each topic,
along with the description of each topic in the TopicList.
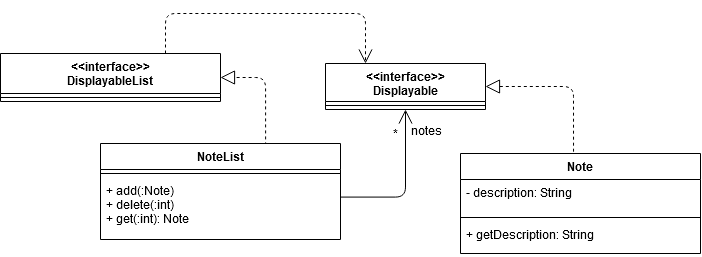
2.2.3. Design of NoteList
NoteList is also an ArrayList of type Displayable. As such, just like with TopicList, many of the commands
that manipulate the NoteList also make use of the package java.util.ArrayList.
Each topic has an attribute of type NoteList, which contains Note objects.
2.2.4. Implementation of Notes
There are 3 commands that involve the manipulation of NoteList objects. They are: note add, which adds a new Note
object, note delete, which deletes a Note object, and note list, which lists out all Note objects in a NoteList from a
specified Topic. These commands are carried out by the instantiation of a NoteCommand object. The NoteCommand
object then performs a task based on the type of command from the user’s input. This is reflected in the following
sequence diagram:
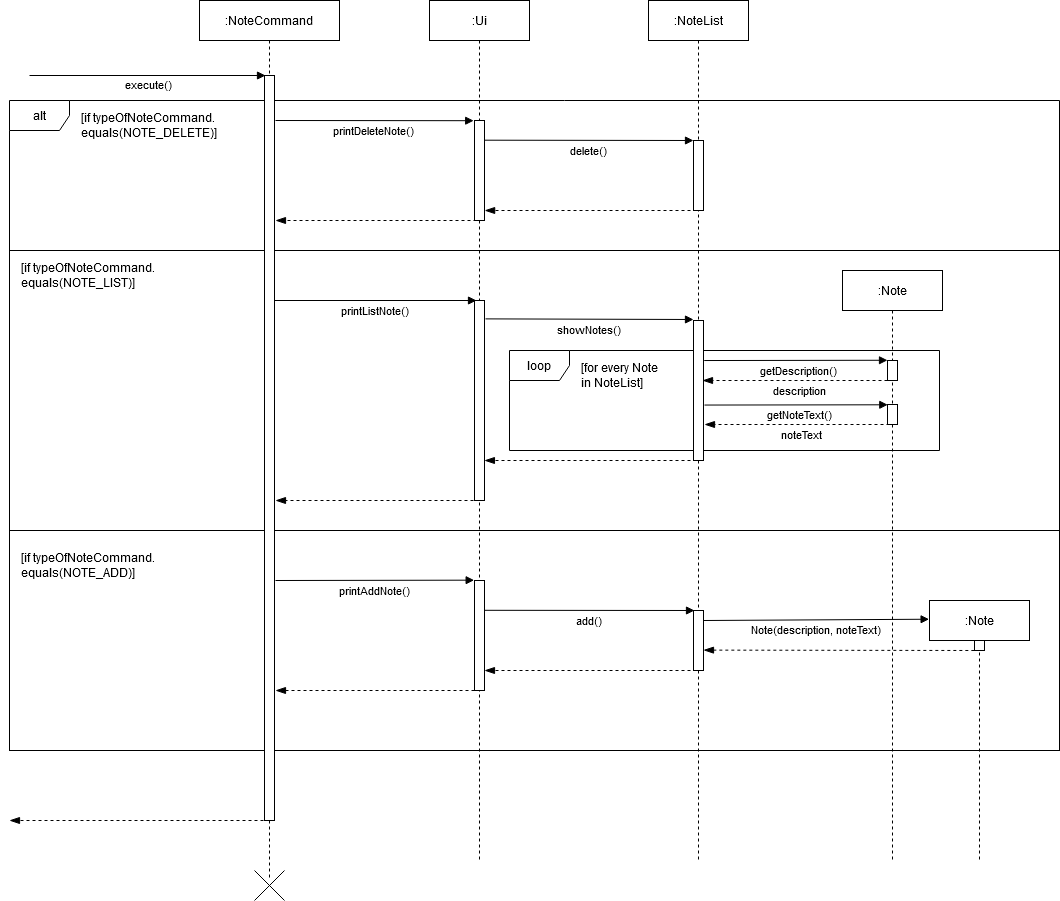
Adding a new note:
This task is performed by the NoteList.add() method.
Step 1: The parseCommand() method instantiates a NoteCommand object which then calls the Ui.addNoteInteractions()
method.
Step 2: The Ui.printAddNote() method uses the user’s input to create a Note object.
Step 3: The Ui.printAddNote() method then calls the method NoteList.add(), passing the created Note object
into this method. NoteList.add() makes use of the package java.util.ArrayList, specifically the ArrayList.add()
method, to add the Note object into the specified NoteList object.
Listing out all notes in a topic:
This task is performed by the Ui.showNotes() method.
Step 1: The parseCommand() method instantiates a NoteCommand object which then instantiates an Ui object
and calls the Ui.printListNote method. The topic’s NoteList object is passed into this method.
Step 2: The Ui.printListNote method calls the Ui.showNotes() method. The topic’s NoteList object is passed into
this method. Ui.showNotes() prints out the descriptions and texts of all the Note objects in the topic’s NoteList
object.
Deleting a note:
This task is performed by the NoteList.delete() method.
Step 1: The parseCommand() method instantiates a NoteCommand object which then calls the Ui.printDeleteNote
method. An integer provided by the user’s input is passed into this method. This integer is interpreted as the index of
the Note object to be deleted in the specified NoteList object.
Step 2: The NoteList.delete() method makes use of the java.util.ArrayList package, specifically the
ArrayList.remove() method, to delete the specified Note object in the specified NoteList object.
2.2.5. Design of Option and OptionList
The Option and OptionList classes implements the Displayable and DisplayableList interfaces respectively.
The Option object stores one option of a question while the OptionList object stores all 4 options of the same
question. The class diagram below illustrates the structure of both classes.
The Option class implements the Displayable interface while the OptionList class implements the DisplayableList interface. The illustration below shows the class diagram of Option and OptionList.

The Option object stores the description of one option from a question. It also indicates if the option is the correct answer for the question by using the isCorrectAnswer boolean.
The OptionList object stores all 4 options of the same question.
2.2.6. Implementation of Option and OptionList
An example of when the Option and OptionList classes are used is when the quiz mode is activated. The quiz requires all the options of a particular question to be printed out.
The diagram below is only an illustration to show the implementation of Option and OptionList classes, it does not show the full sequence diagram of the SingleTopicQuiz() method.
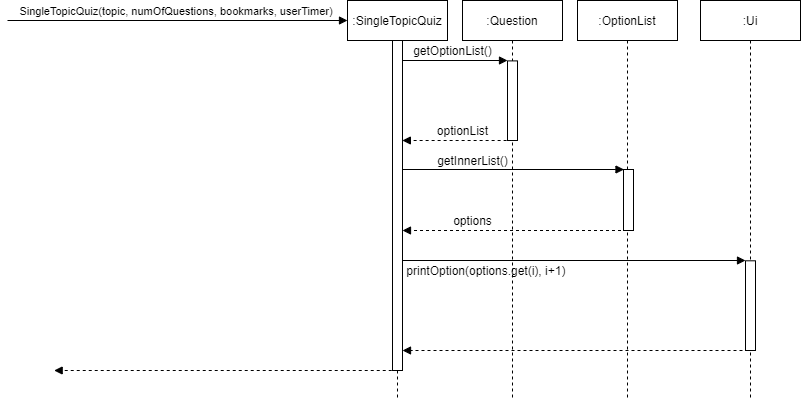
Step 1. When a quiz is started, the SingleTopicQuiz() method will instantiate a SingleTopicQuiz object.
Step 2. The SingleTopicQuiz object then calls the Question class using the getOptionList() method. The Question class then returns optionList.
Step 3. The SingleTopicQuiz object then calls the OptionList class using the getInnerList() method. The OptionList class then returns options which contains the list of 4 options of a particular question that is shown to the user.
Step 4. The SingleTopicQuiz object then calls the Ui to print out all 4 options using the printOption(options.get(i), i+1) method.
The options.get(i) parameter will get the description of the specific option and the i+1 parameter will handle the numbering of the options.
2.3. Logic Component
The main application logic, such as provisioning quizzes, is handled by the Logic component. This component also acts as the middleman between the backend and frontend by processing data before passing it to the user interface and parsing user input from the user interface.
2.3.1. Design of Parser
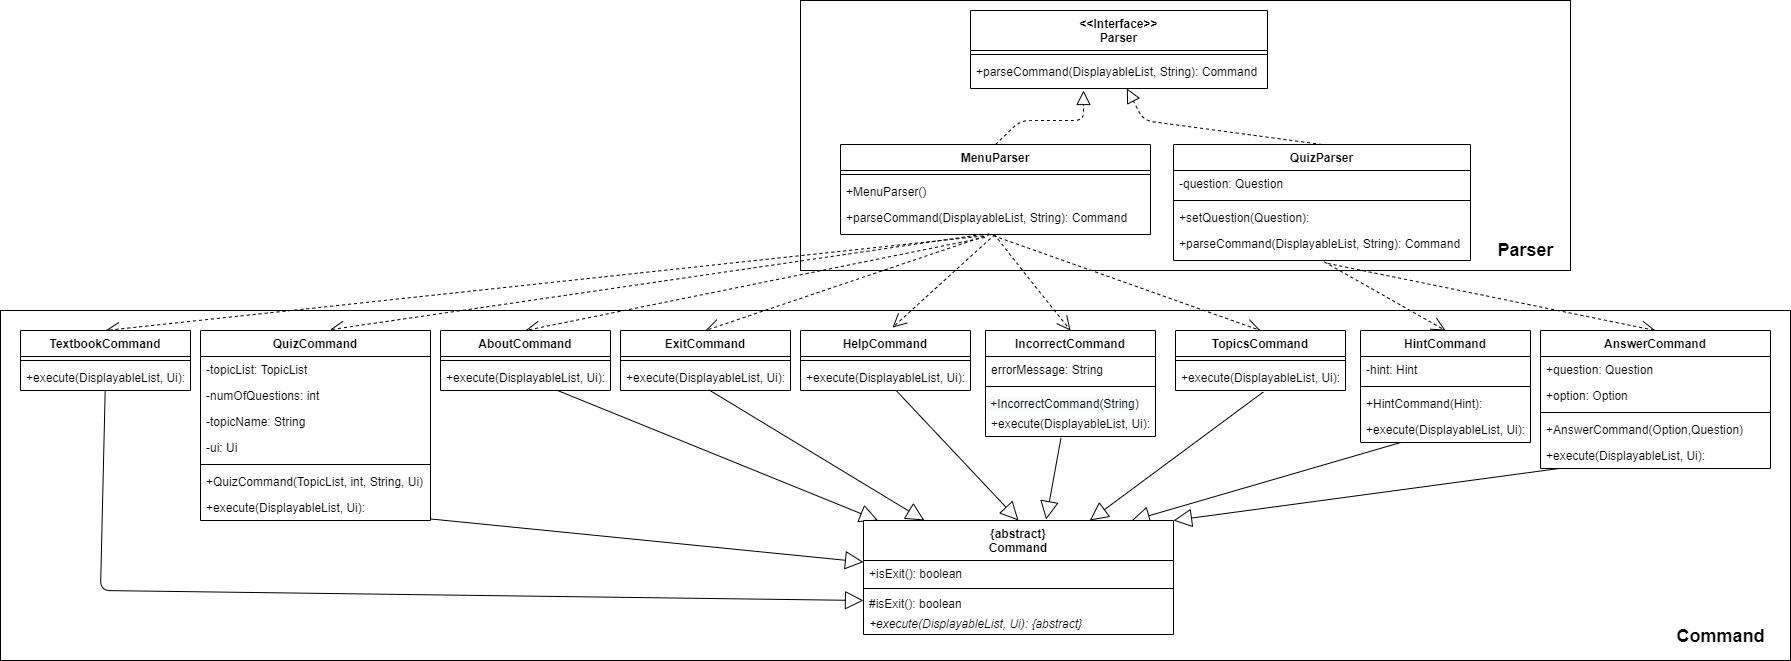
- After constructing a new
MenuParserin theEduke8class, theparseCommand()method is used to parse the user command. - This results in a
Commandobject, which is executed byCommandclass itself, using theexecute()method. - The
Uiobject in theCommandobject is used to display the requested information, or to display the required task to be completed as per the user input.
It should be made clear that parseCommand() returns a new object from the child class of Command. The object’s exact
class depends on the input typed into the command line, and so since parseCommand() returns all these objects from the
various specific Command classes, the MenuParser which has the parseCommand() method is dependent on all these
specific Command classes.
2.3.2. Implementation of MenuParser
Below is the sequence diagram for how the Parser component of Eduke8 works with commands to show output to the user.
The command parsing feature is our program’s way of reading the user’s input into the command line. It makes use of a
single method parseCommand() that identifies what command the user is calling for and then calls the command. There are
two parsers in our program that implements a single Parser interface. One parser is for choosing menu options and is
named MenuParser. The other parser is used during quizzes, in order to answer questions or request for hints, and is
called QuizParser. Given below is an example usage scenario of how the command parsing feature works at each step,
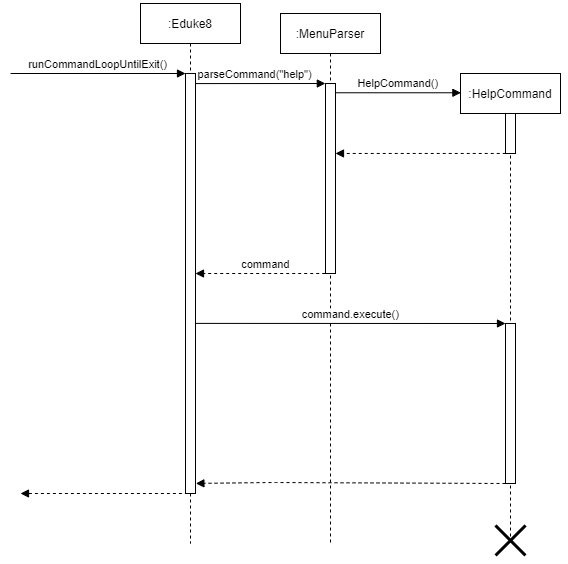
when the user types in input to get help in order to see what commands are available to the user.
Step 1. The user launches the program for the first time. The MenuParser will be initialised and awaiting the user’s
input to proceed.
Step 2. The user types in “help” into the command line interface and presses enter. This user input “help” is stored as
a string and is put into the parseCommand() method as a parameter, together with the list of topics. This
topic list is not relevant to the help command for now.
Step 3. The user input string is subjected to the lang.string.trim() and lang.string.split() functions of a string
in the Java libraries in order to remove redundant spaces around the input, and to discern the number of words
in the input. The lang.string.split() function uses a blank space string, “ “, as the delimiter to split the
string into its individual components.
Step 4. Each subsequent string separated by a space is stored in a string array commandArr[]. The 0th index of the
commandArr[] array is the first word, the 1st index is the second word, and so on. In this case there is only
one word stored in the array, at the 0th index, which is “help”.
Step 5. The string at the 0th index is then used in a switch statement, where each case represents the different menu
options available. As such, the contents of the case with reference “help” is run, which is a return statement
containing a new HelpCommand(). This leads to the execution of the help command.
2.3.3. Design of QuizQuestionsManager
To start a quiz in E-Duke-8, the user will have to give some inputs, and these include the number of questions that he wants to attempt, as well as the topic to get the questions from. Thereafter, questions will be shown to the user one by one until all of them are attempted.
The class diagram given below explains the high-level design of the quiz system in E-Duke-8. Given below it is a quick overview of each component.

An object of SingleTopicQuiz class represents an instance of the quiz in E-Duke-8. Its numberOfQuestions attribute and Topic object correspond to the user’s specified number of questions and topic for the quiz respectively.
The startQuiz(:Ui) method call from the SingleTopicQuiz object initializes an object of QuizQuestionsManager, by passing into its constructor QuizQuestionsManager(:int, :ArrayList<Displayable>) the arguments numberOfQuestions for its first parameter and an ArrayList of questions from the Topic object for its second parameter. The QuizQuestionsManager object will then randomly select numberOfQuestions questions from the topic the user has chosen, using its setQuizQuestions(:int, :ArrayList<Displayable>) method, where the first parameter will take in numberOfQuestions and its second parameter will take in the ArrayList of questions from the Topic object passed into the QuizQuestionsManager object. The questions’ selection process will be further explained in the subsequent section on the Implementation of QuizQuestionsManager.
After a quiz has started, by making use of QuizQuestionsManager’s getNextQuestion() and areAllQuestionsAnswered() method calls, the goThroughQuizQuestions(:Ui, :QuizQuestionsManager) will loop through the questions until the user has answered all of them on the command line interface.
2.3.4. Implementation of QuizQuestionsManager
As mentioned earlier in the section on the design of the quiz system, a QuizQuestionsManager object will randomly select the indicated number of questions from the list of questions in the Topic object, and these will form the quiz questions for the user.
The sequence diagram below shows how QuizQuestionsManager is implemented to achieve this for the scenario where the user indicates that he wants to attempt 5 questions from the topic on OOP, which translates to the setQuizQuestions(5, questionsInTopic) call:
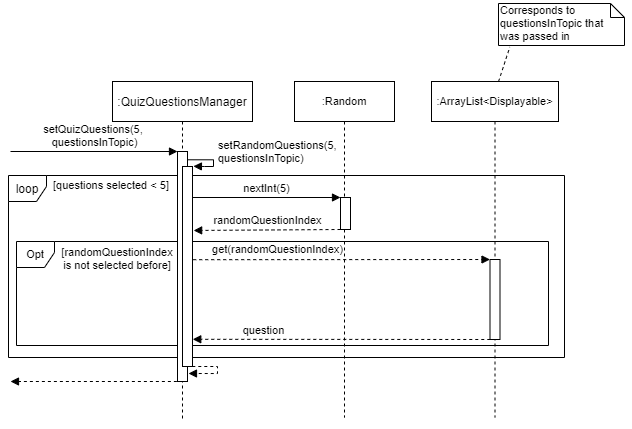
nextInt(5) is a method call to an object of the Random class. It returns a random integer randomQuestionIndex where its value is between 0 (inclusive) and the number passed in as argument, 5 in this scenario, exclusive.
Using the Arraylist’s method of get(randomQuestionIndex), a random question will be selected from the list of questions in the Topic object. This process is done repeatedly in a loop until the correct number of questions are selected.
To ensure that no two of the same question is selected, the selected randomQuestionIndex is checked to see if it is repeated. To determine if randomQuestionIndex is not selected before, an integer ArrayList is initialized to record all the selected integers. By checking against this collection of integers, it can be determined if a currently selected integer is repeated or not, and if it is, no question will be added for that iteration of the loop.
An ArrayList of Question objects stores all the selected questions meant for the quiz.
2.3.5. Design of Stats Feature
E-Duke-8 allows for user’s stats to be shown to the user when requested. These statistics correspond to the results of the user’s past attempts of the quiz. An aggregate result, followed by topical results of the quiz will be displayed.
A Stats class facilitates what is to be shown to the user. It also calls the methods of the objects of the two subclasses of StatsCalculator, UserStatsCalculator and TopicalStatsCalculator to retrieve the necessary information to be displayed.
The class diagram given below showcases the high-level design of the stats feature in E-Duke-8. Given below it is a quick overview of each component.
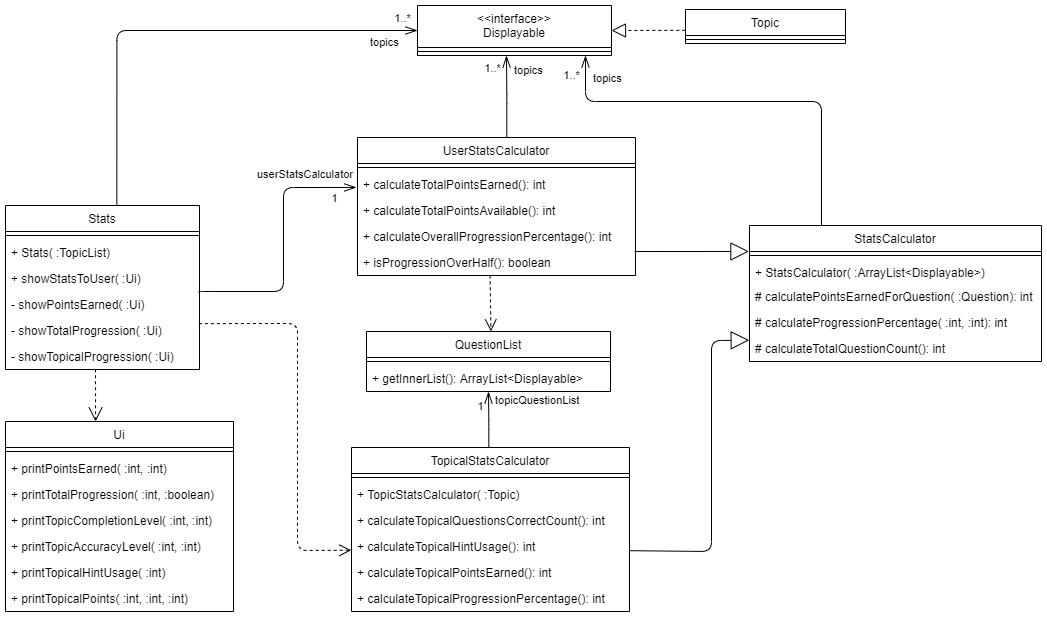
Results of the quiz attempts can be calculated using the information stored in a Question object, because of its methods, namely wasShown(), wasHintShown() and wasAnsweredCorrectly(), that indicate if it has been attempted before, whether hint was used when user attempted the question and if the question was answered correctly respectively.
The current design of the stats feature is such that a correct answer without hint being used would award the user with 2 points, while a correct answer with hint used would award the user with 1 point. No point is awarded to the user if they chose the wrong answer. calculatePointsEarnedForQuestion(:Question) in StatsCalculator class and its subclasses, is the method that contains the logic for this calculation.
An object of UserStatsCalculator class is responsible for calculating the aggregate results from the user’s previous quiz results. For instance, its calculateTotalPointsEarned() method will iterate through the multiple topics stored in E-Duke-8 and calculate the total sum of the user’s past results of the quizzes done for those topics.
On the other hand, an object of TopicalStatsCalculator is used by the object of Stats class to calculate the topical results. In its constructor, the TopicalStatsCalculator object uses the single Topic object passed into it to retrieve its specific QuestionList object. Thereafter, by iterating through the questions for the particular QuestionList object, the results for individual topics can be calculated with its methods.
2.3.6. Implementation of Stats Feature
The current implementation of the stats feature is such that the object of Stats class controls what is shown to the user when the stats command is received. It calls on methods of a UserStatsCalculator object and a TopicalStatsCalculator object to calculate and retrieve the statistics of the user’s previous attempts of quizzes in E-Duke-8, before displaying them.
The sequence diagram below shows the interactions between the different objects when showPointsEarned(ui) is invoked, by the object of Stats class, to display to the user the total points he has earned in E-Duke-8 so far, out of all the points that he can potentially earn.
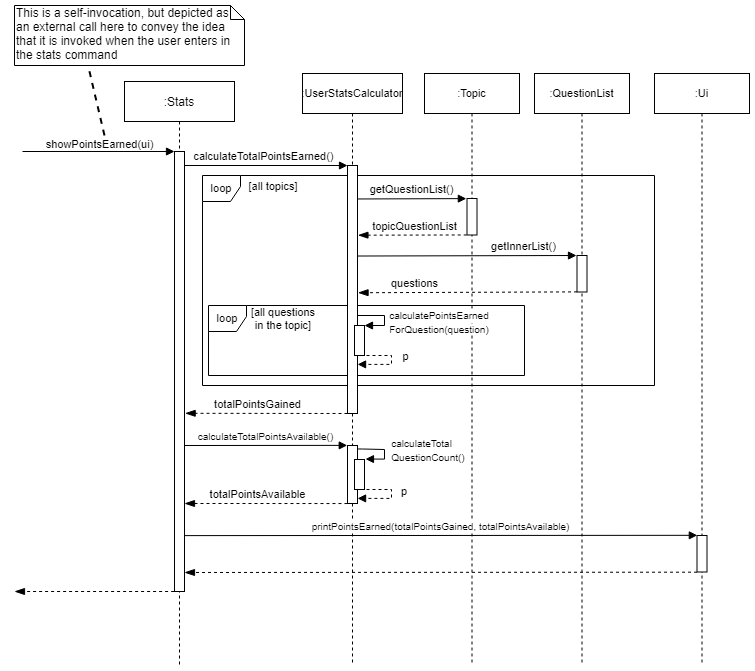
Through the logic in the object of UserStatsCalculator, necessary information regarding the user’s statistics, such as the totalPointsGained integer value and totalPointsAvailable integer value, are calculated, and then passed to the Ui object to print them to the user. This same concept and procedure are applied to the display the other aggregate results.
A similar procedure is being employed by the TopicalStatsCalculator object to calculate the topic-level statistics for the user. The only difference between the objects of these two classes is that instead of iterating through all the topics available, the TopicalStatsCalculator object only deals with a particular topic at any point of time. By iterating through the questions of the single topic, it calculates statistics for the topic and returns it back to the Stats object, which will then pass them to the Ui object to display them to the user. As such, in order to display the user’s statistics for each and every topic, a loop is done in the Stats object to repeatedly calculate the topic-level information for all of the topics and displaying them concurrently.
2.3.7. Implementation of Timer Feature
E-Duke-8 has a timer feature for the quiz. The users are able to choose how much time (in seconds) they require to complete each question.
The timer would start as soon as the options are being printed out.
If the user has typed in a valid answer, the timer would stop and move on to the next question.
If the time is up, it will be regarded as an IncompleteCommand and it will be deemed as a wrong answer as well.
The diagram and explanation below only illustrates the implementation of the timer feature,
it does not show the full sequence diagram and explanation of the SingleTopicQuiz() method.
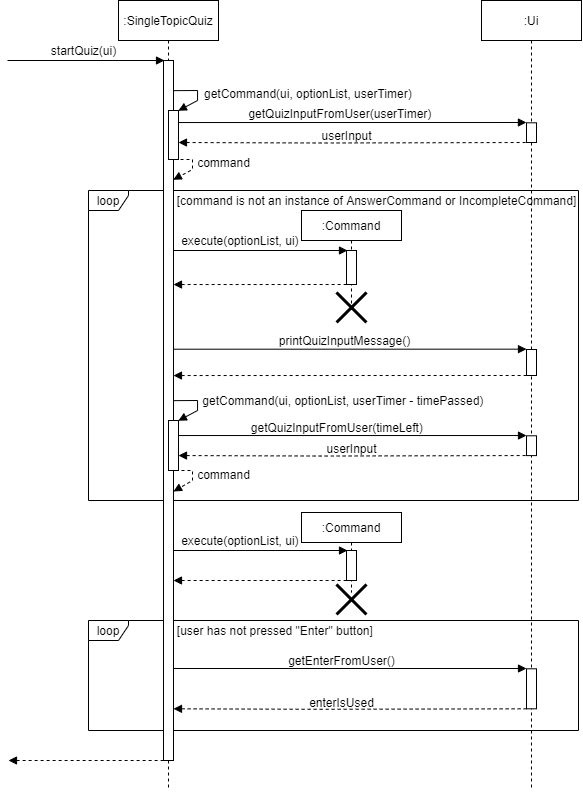
When a quiz is started, the startQuiz(ui) method will be called.
After the options of a particular question has been printed out, the timer would begin.
The getCommand(ui, optionList, userTimer) method is first called. The userTimer parameter used here is the time that the user has set at the start of the quiz.
The getQuizInputFromUser(userTimer) method will then call the Ui class to read in the users’ input. The timer continues to count down as it waits for the users’ input.
After the user has written an input, the Ui will return the userInput string back to the SingleTopicQuiz object.
If the user did not write in any input and the time is up, the Ui will return null string back to the SingleTopicQuiz object instead.
The Command object will be returned.
For example, if the user entered a string (that is not “hint” or “bookmark” and not a number from 1 to 4), then the Command returned will be one of IncorrectCommand.
If the user entered any number from 1 to 4, it will be an AnswerCommand.
If the user did not input anything and the time is up, the Command returned will be IncompleteCommand.
It will then enter into a loop and remain in this loop unless the user has input a valid answer or the time is up for that question.
In the loop, the SingleTopicQuiz object will then call the respective Command object, using the execute(optionList, ui) method.
For example, if it is a HintCommand, then the execution would mean that the hint will be printed out by the Ui class to show the user the hint for the particular question.
However, some details were omitted here so that the sequence diagram is easier to understand.
The SingleTopicQuiz object will then call the Ui class using the printQuizInputMessage() method to print the prompt for the users to enter in their input.
The getCommand(ui, optionList, userTimer - timePassed) method will be called again. However, this getCommand() method is different from the one that was used initially.
This getCommand() method takes in the time left on the timer (userTimer - timePassed) instead of the timer set by the user.
This is because, we want to avoid the situation where the user is able to extend the timer by entering in any random value (except number 1 to 4) as this would cause the timer to reset everytime.
Hence, in order to prevent this bug, for this getCommand() method, we have to use the time left on the timer instead.
The subsequent steps are similar to the one stated above.
The loop will end if the user has written an input or the time is up for that question.
The SingleTopicQuiz object will then proceed to execute the Command for the last time, using the execute(optionList, ui) method.
It will then enter another loop that checks if the user has pressed on the “Enter” button on the computer.
This feature was implemented so that they have sufficient time to read through and understand the explanation before moving on to the next question.
The Ui class will be called by the getEnterFromUser() method. This method will prompt the user to press the “Enter” button.
The Ui class will then return the boolean enterIsUsed.
If the user has pressed on any keys other than “Enter”, the boolean enterIsUsed is set to false and it will remain in the loop.
If the user has pressed on the “Enter” button, the boolean enterIsUsed is set to true and it will exit out of the loop and proceed to the next question.
2.4. Storage Component
The storage component is implemented locally and mainly saves and loads files in JavaScript Object Notation (JSON) format, except for log files which are stored as normal text files. The JSON format was chosen as it is a well-known standard which is easy to parse.
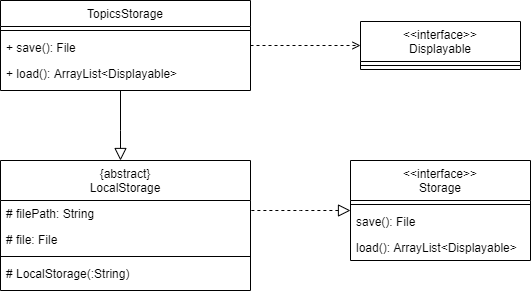
2.4.1. Design of TopicsStorage
Given data for the topics and questions is loaded automatically from JSON files in the data folder. This is mainly facilitated through the TopicsStorage
class which handles accessing the file as well as converting from JSON into Topic, Question and Option objects.
The class diagram below shows this relationship.
The format of the JSON file is important as it is loaded in a particular way. This format has been designed as an array of topics that hold the different properties for questions, options, hints and explanations. An example is as such:
[
  {
    "topic": "Topic Title",
    "questions": [
      {
        "description": "What is your question?",
        "hint": "Put the hint here",
        "explanation": "Put the explanation here",
        "options": [
          {
            "description": "This is the first option and correct answer",
            "correct": true
          },
          {
            "description": "This is the second option",
            "correct": false
          },
          {
            "description": "This is the third option",
            "correct": false
          },
          {
            "description": "This is the fourth option",
            "correct": false
          }
        ]
      }
    ]
  }
]
Users may choose to edit this data as well and are provided with the following requirements from the User Guide:
Note that the title will be loaded with spaces replaced with underscores, there must be 4 options for each question, and there must be one and only one option chosen as the correct answer by specifying
trueas the value of thecorrectkey.
Note that a default data file is packaged together with the jar file such that the application can still run without downloading the data file. If users want to edit the data they are instructed to on how to download and set up the external custom file which will be loaded with a higher priority than the one packaged.
2.4.2. Implementation of TopicsStorage
When the user launches the app, the main program will initialize a TopicsStorage object and call the load() method which will return an ArrayList of Topic objects.
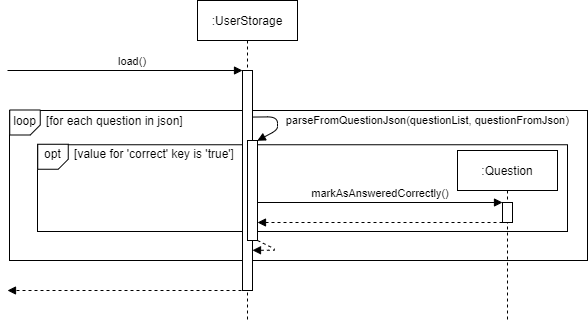
The following sequence diagram shows how the load operation works, focusing on how options are marked as correct:
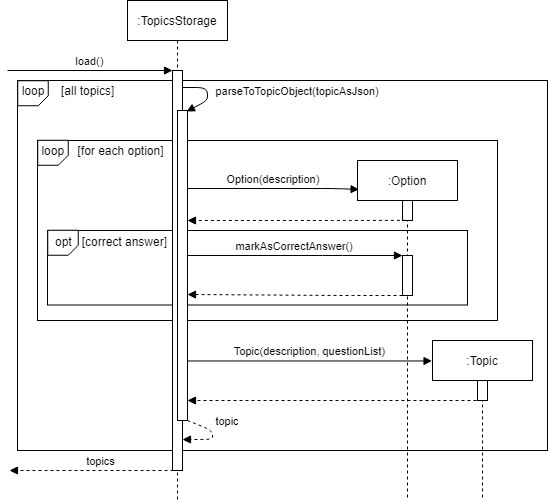
As there is a high level of nesting in the JSON file, many methods are called in loops to parse each section and return them as objects which are then used to build the next object at a higher level.
In the diagram above, the Option objects within each Topic has to be constructed with a description from the file.
They are then marked as the correct answer with markAsCorrectAnswer() if the value of the key correct was true in the given data.
More properties can easily be added to the classes and the storage component in a similar way, by parsing in loops.
2.4.3. Design of UserStorage
In order to save and load attributes specific to each user, such as the questions attempted, answered correctly or bookmarked, a UserStorage class is used to selectively store these attributes into a JSON file, user.json.
This class requires access to the main TopicList and BookmarkList from the Model component in order to extract these attributes. The class diagram below shows this relationship.
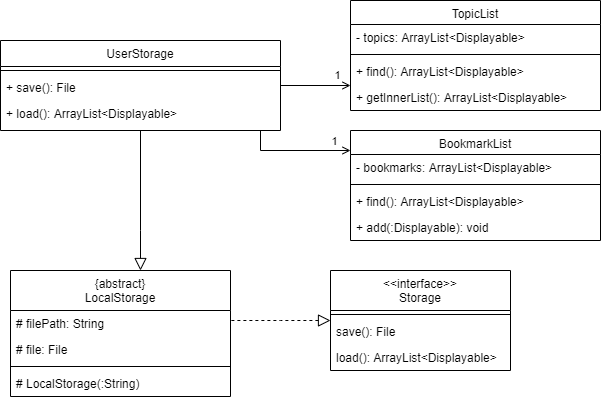
The attributes will be saved in the JSON file tied to each question in a topic and is identified by its description. A question’s presence in the file represents that it has been attempted before while other attributes are stored as boolean values. An example is given below.
[
  {
    "notes":[],
    "questions": [
      {
        "correct":true,
        "bookmarked":true,
        "hint":false,
        "description":"First Question"
      },
      {
        "correct":false,
        "bookmarked":false,
        "hint":true,
        "description":"Second Question"
      }
    ],
    "topic":"First Topic"
  },
  {
    "notes":[
      {
        "description":"Note Title",
        "text":"Note Text"
      }
    ],
    "questions":[],
    "topic":"Second Topic"
  }
]
Unlike topics.json, users should not be editing the user.json file as it is system generated.
If the user edits this file and does not follow the correct format then the affected parts of the data will be lost but the
program will continue to run.
2.4.4. Implementation of UserStorage
Unlike TopicsStorage which constructs objects, UserStorage accesses existing objects in order to extract their attributes.
The following sequence diagram shows an example of getting the topic description from a Topic object within the TopicList in order to save attributes for that particular Topic object.
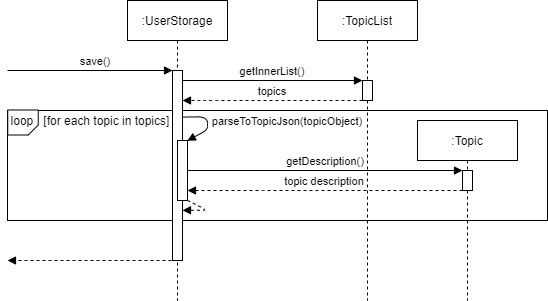
It can be noted here that the Topic object is the same one constructed by TopicsStorage and continues to persist until the program shuts down.
A similar method is used to extract the attributes from each Question object inside the Topic object.
For example, the wasAnsweredCorrectly() method is called on the Question object to check if it was answered
correctly by the user or not.
This value is then stored as an attribute of the question in the JSON file.
Loading back the user data is done in reverse. If the boolean value of the key correct is true for a
particular question, then the markAsAnsweredCorrectly() method is called on the corresponding Question object. This is depicted below in the sequence diagram.
2.5. UI Component
The command line interface was chosen for users that prefer to type using a keyboard over using the mouse.
2.5.1. Implementation of Ui
The Ui class handles all the interactions with the users. It reads the input from the users and prints out replies to
the users. It is the point of communication between E-Duke-8 and the users.
An example is provided below to illustrate how the Ui class prints out the starting page of the quiz for
the user to comprehend.
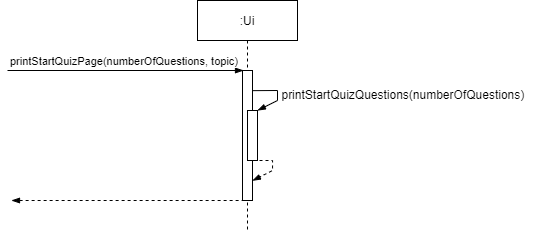
As the user starts the quiz, the Ui class will print out the quiz page to show that the quiz has started.
The user inputs the number of questions that he wants to answer and also the topics that he wants to be tested on.
The Ui will go through printStartQuizQuestions() to print out the number of questions that the user has chosen.
Afterwards, the Ui will go through printStartQuizTopics() to print out the topics that the user has chosen.
3. Appendix
3.1. Product scope
3.1.1. Target user profile
CS2113/T Students
3.1.2. Value proposition
To help CS2113/T students learn and understand software engineering and Object-oriented Programming (OOP) principles through a gamified platform and enhances their learning experience.
It is a desktop application where CS2113/T students can attempt bite-sized quizzes, through the Command Line Interface (CLI), to test their understanding of the concepts taught, and serves to consolidate key concepts for easy revision.
Students can earn points for themselves as they answer questions in the quizzes, and they can view their quizzes’ statistics to gauge their level of mastery of the topics in CS2113/T.
3.2. User Stories
| Version | As a … | I want to … | So that I can … |
|---|---|---|---|
| v1.0 | new user | quickly see what the software has to offer | understand how to use the app |
| v1.0 | new user | answer given questions | start testing myself immediately |
| v1.0 | long-time user | get different questions each time | repeatedly test my understanding for the particular topic |
| v1.0 | busy user | test myself on concepts using short, targeted quizzes | confirm my understanding of concepts |
| v1.0 | user | get a hint for the question in the quiz | think about the question from a different angle |
| v1.0 | user | see what the available topics are | navigate around the app effectively |
| v1.0 | user | select the number of questions to do in the quiz | manage the workload and time spent on the quiz |
| v2.0 | slow but hardworking user | see the explanations provided in the quiz | learn from my mistakes and revise |
| v2.0 | busy, lazy user | take note of key concepts | refer to it easily at a later time |
| v2.0 | frequent disorganized user | view the percentage of error in each topic | tell how well I understand the content |
3.3. Non-Functional Requirements
- Should work on any mainstream Operating System (OS) as long as it has Java 11 or above installed.
- A user with above average typing speed for regular English text (i.e. not code, not system admin commands) should be able to accomplish most of the tasks faster using commands than using the mouse.
3.4. Glossary
-
Command Line Interface (CLI): CLI is a text-based interface that allows users to respond to visual prompts by typing single commands into the interface and receiving a reply in the same way. (From techopedia)
-
Object-oriented Programming (OOP): OOP is a programming paradigm. A programming paradigm guides programmers to analyze programming problems, and structure programming solutions, in a specific way. (From CS2113/T textbook)
-
Mainstream Operating Systems (OS): Windows, Linux, Unix, OS-X
3.5. Instructions for manual testing
To test the product please refer to the E-Duke-8 User Guide. The following are a few testcases to try out.
3.5.1. Loading data
- Dealing with missing/corrupted data files
- Find
topics.jsoninsidedata/main. - Test case: Delete the file
Expected: Application will not launch properly and error message will be displayed. - Test case: Change a topic title
Expected: Application will launch successfully but related user data will be erased. - Test case: Remove the
questionskey from a topic
Expected: Application will not launch properly and error message will be displayed. - Other ways to corrupt the data files: Remove other keys or mess up the JSON format (remove the outer array)
Expected: Similar to previous.
- Find
3.5.2. Starting a quiz
- Giving quiz commands with different input formats
- Test case:
quiz n/2 t/oop s/10
Expected: Starts a quiz successfully ith 2 questions from the topic of OOP and a time limit for 10 seconds for each question. - Test case:
quiz n/2 t/oop
Expected: Quiz will not start. Error message will show and the ideal format structure will be displayed to user. - Test case:
quiz n/2 hi t/oop s/5
Expected: Quiz will not start. Error message will show and the ideal format structure will be displayed to user. - Other ways to start quiz in wrong format: Use the quiz command but give insufficient inputs or invalid inputs
Expected: Quiz will not start. Error message will show and the ideal format structure will be displayed to user.
- Test case:
- Trying to start a quiz with invalid inputs
- Test case:
quiz n/2 t/oop a/10
Expected: Quiz will not start. Error message will show and the ideal format structure will be displayed to user. - Test case:
quiz n/2 t/oop s/0
Expected: Quiz will not start. Error message will show to prompt user to give a valid time limit. - Test case:
quiz n/2 t/none s/5
Expected: Quiz will not start. Error message will tell user that the topic does not exist in E-Duke-8 and where they can find the available topics. - Test case:
quiz n/0 t/oop s/5
Expected: Quiz will not start. Error message will tell user to specify more than 0 quiz questions. - Other ways to start quiz in wrong format: Use the quiz command but give insufficient inputs or invalid inputs
Expected: Similar to previous.
- Test case: